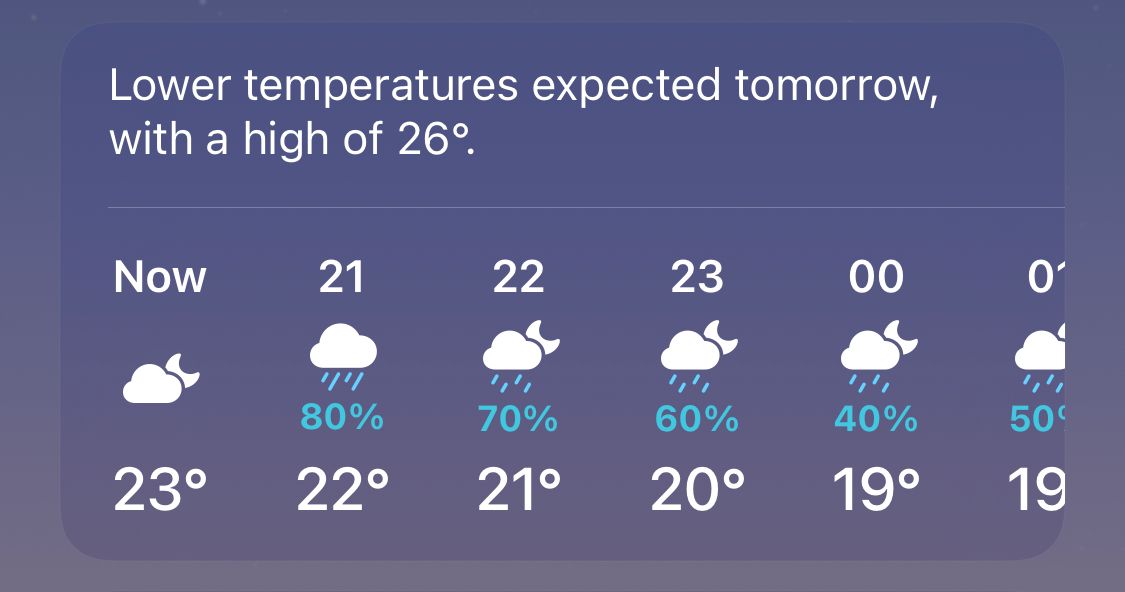
Let’s see how can we build this component of Apple’s weather app in SwiftUI.
First, what do we need to display within the view?
- The headline of the forecast
- Hours
- Rain percentage
- Weather State
Let’s define that in a data model:
struct HourlyForecastModel {
    let headline: String
    let forecasts: [HourForecast]

    static private var staticRandomHeadlines = [
        "Lower temperatures expected tomorrow, with a high of 16°.",
        "Higher temperatures expected today, with a high of 20°",
    ]

    static func makeRandom() -> HourlyForecastModel {
        let randomHourForecasts = (0...24).map { HourForecast.makeRandom(
            hour: Calendar.current.component(
                .hour,
                from: Calendar.current.date(
                    byAdding: .hour,
                    value: $0,
                    to: Date()
                )!
            ))
        }

        return HourlyForecastModel(
            headline: self.staticRandomHeadlines.randomElement()!,
            forecasts: randomHourForecasts
        )
    }
}

struct HourForecast {
    let hour: Int
    let celsius: Int
    let weatherType: WeatherType

    static func makeRandom(hour: Int) -> HourForecast {
        .init(
            hour: hour,
            celsius: Int.random(in: -10...20),
            weatherType: WeatherType.allCases.randomElement()!
        )
    }
}

extension HourForecast: Hashable { }

enum WeatherType {
    case sunny
    case cloud
    case rain
    case snow
    case hail
    case lightning

    var systemNameIcon: String {
        switch self {
        case .sunny:
            return "sun.min.fill"
        case .cloud:
            return "cloud.fill"
        case .rain:
            return "cloud.rain.fill"
        case .snow:
            return "cloud.sleet.fill"
        case .hail:
            return "cloud.hail.fill"
        case .lightning:
            return "cloud.bolt.fill"
        }
    }
}

extension WeatherType: CaseIterable { }
To help us with displaying, we’ve also added a few static random data generators.
Then let’s create a data service provider and a ViewModel to allow a view to display the data to a UI.
protocol ForecastProviding {
    func getHourlyForecastData() -> HourlyForecastModel
}

final class MockForecastProvider: ForecastProviding {
    func getHourlyForecastData() -> HourlyForecastModel {
        return .makeRandom()
    }
}

@MainActor
final class ContentViewModel: ObservableObject {
    @Published var data: HourlyForecastModel

    private let forecastProvider: ForecastProviding

    init(forecastProvider: ForecastProviding = MockForecastProvider()) {
        self.forecastProvider = forecastProvider
        self.data = self.forecastProvider.getHourlyForecastData()
    }
}
Now, our ContentViewModel receives a provider that allows data to be fetched, and then once the data is retrieved, we publish it.
Lastly, let’s create a view similar to the one of the official Apple weather app, which subscribes to the provided data.
struct ContentView: View {
    @StateObject private var viewModel = ContentViewModel()

    var body: some View {
        hourForecastView
    }

    private var hourForecastView: some View {
        VStack(alignment: .leading) {
            Text(viewModel.data.headline)
                .padding(.horizontal)

            Divider()

            ScrollView(.horizontal, showsIndicators: false) {
                LazyHStack(alignment: .top, spacing: 24) {
                    ForEach(viewModel.data.forecasts, id: \.self) { forecast in
                        VStack {
                            Text("\(forecast.hour)")
                                .bold()

                            Image(systemName: forecast.weatherType.systemNameIcon)
                                .imageScale(.large)
                                .frame(height: 40)

                            Text("\(forecast.celsius)°")
                                .bold()
                        }
                    }
                }
                .padding([.horizontal])
            }
        }
        .padding(.vertical)
        .frame(height: 200)
        .foregroundColor(.white)
        .background(
            LinearGradient(gradient: Gradient(colors: [.accentColor.opacity(0.8), .accentColor.opacity(0.6)]), startPoint: .leading, endPoint: .trailing)
        )
        .cornerRadius(16)
    }
}
Let’s see it in action.
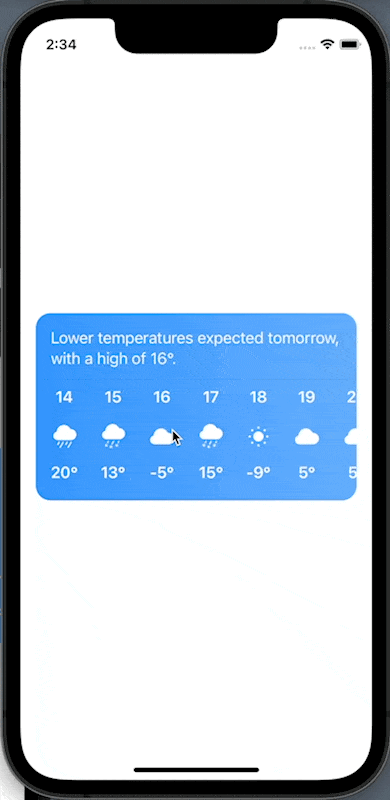
Although, not exactly like the official Apple weather app hourly forecast component, it’s a start!
Now hopefully, you have a better idea of how to create a similar component for your app.
The full source code is available here.
Happy coding!